MacOS 12.2
iterm2/terminal/putty [SSH] 에서 오라클클라우드 접속 mysql 설치
Step 1: Update your system
Ensure your system is updated.
sudo yum updateConfirm list of a packages to be updated and hit the y key if you’re okay with it.
Dependencies resolved.
========================================================================================================================================================
 Package                                   Architecture             Version                                   Repository                           Size
========================================================================================================================================================
Installing:
 kernel                                    x86_64                   4.18.0-193.1.2.el8_2                      ol8_baseos_latest                   2.8 M
 kernel-core                               x86_64                   4.18.0-193.1.2.el8_2                      ol8_baseos_latest                    28 M
 kernel-modules                            x86_64                   4.18.0-193.1.2.el8_2                      ol8_baseos_latest                    23 M
Upgrading:
 bpftool                                   x86_64                   4.18.0-193.1.2.el8_2                      ol8_baseos_latest                   3.4 M
 gnutls                                    x86_64                   3.6.8-10.el8_2                            ol8_baseos_latest                   915 k
 iproute                                   x86_64                   5.4.0-1.0.1.el8                           ol8_UEKR6                           665 k
 kernel-tools                              x86_64                   4.18.0-193.1.2.el8_2                      ol8_baseos_latest                   2.9 M
 kernel-tools-libs                         x86_64                   4.18.0-193.1.2.el8_2                      ol8_baseos_latest                   2.8 M
 nftables                                  x86_64                   1:0.9.3-12.0.1.el8                        ol8_baseos_latest                   311 k
 oraclelinux-release                       x86_64                   8:8.2-1.0.8.el8                           ol8_baseos_latest                    66 k
 python3-nftables                          x86_64                   1:0.9.3-12.0.1.el8                        ol8_baseos_latest                    25 k
 python3-perf                              x86_64                   4.18.0-193.1.2.el8_2                      ol8_baseos_latest                   2.9 M
 selinux-policy                            noarch                   3.14.3-41.0.1.el8_2.2                     ol8_baseos_latest                   615 k
 selinux-policy-targeted                   noarch                   3.14.3-41.0.1.el8_2.2                     ol8_baseos_latest                    15 M
 systemd                                   x86_64                   239-30.0.2.el8_2                          ol8_baseos_latest                   3.5 M
 systemd-libs                              x86_64                   239-30.0.2.el8_2                          ol8_baseos_latest                   1.1 M
 systemd-pam                               x86_64                   239-30.0.2.el8_2                          ol8_baseos_latest                   450 k
 systemd-udev                              x86_64                   239-30.0.2.el8_2                          ol8_baseos_latest                   1.3 M
 tzdata                                    noarch                   2020a-1.el8                               ol8_baseos_latest                   469 k
 xfsprogs                                  x86_64                   5.4.0-1.el8                               ol8_UEKR6                           1.1 M

Transaction Summary
========================================================================================================================================================
Install   3 Packages
Upgrade  17 Packages

Total download size: 92 M
Is this ok [y/N]: y
Reboot your machine:
sudo systemctl rebootConfirm the current release of Oracle Linux 8 you’re running:
$ cat /etc/oracle-release
Oracle Linux Server release 8.2
Step 2: Install MySQL 8.0 on Oracle Linux 8
MySQL 8.0 package is available on the AppStream repository of the Oracle Linux operating system.
$ sudo dnf module list mysql
Last metadata expiration check: 0:06:21 ago on Fri 29 May 2020 10:27:56 PM UTC.
Oracle Linux 8 Application Stream (x86_64)
Name                             Stream                             Profiles                                      Summary
mysql                            8.0 [d]                            client, server [d]                            MySQL Module

Hint: [d]efault, [e]nabled, [x]disabled, [i]nstalled
To Install MySQL 8.0 on Oracle Linux 8 server, run the command below.
sudo dnf install @mysql:8.0Accept the installation of MySQL 8.0 on Oracle Linux 8.0:
Dependencies resolved.
========================================================================================================================================================
 Package                                 Architecture        Version                                               Repository                      Size
========================================================================================================================================================
Installing group/module packages:
 mysql-server                            x86_64              8.0.17-3.module+el8.0.0+5253+1dce7bb2                 ol8_appstream                   22 M
Installing dependencies:
 mariadb-connector-c-config              noarch              3.0.7-1.el8                                           ol8_appstream                   13 k
 mecab                                   x86_64              0.996-1.module+el8.0.0+5253+1dce7bb2.9                ol8_appstream                  397 k
 mysql                                   x86_64              8.0.17-3.module+el8.0.0+5253+1dce7bb2                 ol8_appstream                   11 M
 mysql-common                            x86_64              8.0.17-3.module+el8.0.0+5253+1dce7bb2                 ol8_appstream                  143 k
 mysql-errmsg                            x86_64              8.0.17-3.module+el8.0.0+5253+1dce7bb2                 ol8_appstream                  557 k
 perl-Carp                               noarch              1.42-396.el8                                          ol8_baseos_latest               30 k
 perl-Encode                             x86_64              4:2.97-3.el8                                          ol8_baseos_latest              1.5 M
 perl-Errno                              x86_64              1.28-416.el8                                          ol8_baseos_latest               76 k
 perl-Exporter                           noarch              5.72-396.el8                                          ol8_baseos_latest               34 k
 perl-File-Path                          noarch              2.15-2.el8                                            ol8_baseos_latest               38 k
 perl-File-Temp                          noarch              0.230.600-1.el8                                       ol8_baseos_latest               63 k
 perl-Getopt-Long                        noarch              1:2.50-4.el8                                          ol8_baseos_latest               63 k
 perl-HTTP-Tiny                          noarch              0.074-1.el8                                           ol8_baseos_latest               58 k
 perl-IO                                 x86_64              1.38-416.el8                                          ol8_baseos_latest              141 k
 perl-MIME-Base64                        x86_64              3.15-396.el8                                          ol8_baseos_latest               31 k
 perl-PathTools                          x86_64              3.74-1.el8                                            ol8_baseos_latest               90 k
 perl-Pod-Escapes                        noarch              1:1.07-395.el8                                        ol8_baseos_latest               20 k
 perl-Pod-Perldoc                        noarch              3.28-396.el8                                          ol8_baseos_latest               88 k
 perl-Pod-Simple                         noarch              1:3.35-395.el8                                        ol8_baseos_latest              213 k
 perl-Pod-Usage                          noarch              4:1.69-395.el8                                        ol8_baseos_latest               34 k
 perl-Scalar-List-Utils                  x86_64              3:1.49-2.el8                                          ol8_baseos_latest               68 k
 perl-Socket                             x86_64              4:2.027-3.el8                                         ol8_baseos_latest               59 k
 perl-Storable                           x86_64              1:3.11-3.el8                                          ol8_baseos_latest               98 k
 perl-Term-ANSIColor                     noarch              4.06-396.el8                                          ol8_baseos_latest               46 k
 perl-Term-Cap                           noarch              1.17-395.el8                                          ol8_baseos_latest               23 k
 perl-Text-ParseWords                    noarch              3.30-395.el8                                          ol8_baseos_latest               18 k
 perl-Text-Tabs+Wrap                     noarch              2013.0523-395.el8                                     ol8_baseos_latest               24 k
 perl-Time-Local                         noarch              1:1.280-1.el8                                         ol8_baseos_latest               33 k
 perl-Unicode-Normalize                  x86_64              1.25-396.el8                                          ol8_baseos_latest               82 k
 perl-constant                           noarch              1.33-396.el8                                          ol8_baseos_latest               25 k
 perl-interpreter                        x86_64              4:5.26.3-416.el8                                      ol8_baseos_latest              6.3 M
 perl-libs                               x86_64              4:5.26.3-416.el8                                      ol8_baseos_latest              1.6 M
 perl-macros                             x86_64              4:5.26.3-416.el8                                      ol8_baseos_latest               72 k
 perl-parent                             noarch              1:0.237-1.el8                                         ol8_baseos_latest               20 k
 perl-podlators                          noarch              4.11-1.el8                                            ol8_baseos_latest              118 k
 perl-threads                            x86_64              1:2.21-2.el8                                          ol8_baseos_latest               61 k
 perl-threads-shared                     x86_64              1.58-2.el8                                            ol8_baseos_latest               48 k
 protobuf-lite                           x86_64              3.5.0-7.el8                                           ol8_appstream                  150 k
Installing module profiles:
 mysql/server
Enabling module streams:
 mysql                                                       8.0

Transaction Summary
========================================================================================================================================================
Install  39 Packages

Total download size: 44 M
Installed size: 249 M
Is this ok [y/N]: y
You can confirm package details.
$ rpm -qi mysql-server
Name        : mysql-server
Version     : 8.0.17
Release     : 3.module+el8.0.0+5253+1dce7bb2
Architecture: x86_64
Install Date: Fri 29 May 2020 10:36:33 PM UTC
Group       : Unspecified
Size        : 144963659
License     : GPLv2 with exceptions and LGPLv2 and BSD
Signature   : RSA/SHA256, Fri 16 Aug 2019 01:39:42 PM UTC, Key ID 82562ea9ad986da3
Source RPM  : mysql-8.0.17-3.module+el8.0.0+5253+1dce7bb2.src.rpm
Build Date  : Fri 16 Aug 2019 01:33:41 PM UTC
Build Host  : jenkins-10-147-72-125-37856c20-4ffa-4820-bdad-6f8ce19058d8.appad1iad.osdevelopmeniad.oraclevcn.com
Relocations : (not relocatable)
Vendor      : Oracle America
URL         : http://www.mysql.com
Summary     : The MySQL server and related files
Step 3: Configure MySQL 8.0 on Oracle Linux 8
Start and enable mysql daemon service to start at system boot.
sudo systemctl enable --now mysqldService status query should return as running.
$ systemctl status mysqld
● mysqld.service - MySQL 8.0 database server
   Loaded: loaded (/usr/lib/systemd/system/mysqld.service; enabled; vendor preset: disabled)
   Active: active (running) since Fri 2020-05-29 22:40:19 UTC; 25s ago
  Process: 6612 ExecStartPost=/usr/libexec/mysql-check-upgrade (code=exited, status=0/SUCCESS)
  Process: 6485 ExecStartPre=/usr/libexec/mysql-prepare-db-dir mysqld.service (code=exited, status=0/SUCCESS)
  Process: 6461 ExecStartPre=/usr/libexec/mysql-check-socket (code=exited, status=0/SUCCESS)
 Main PID: 6569 (mysqld)
   Status: "Server is operational"
    Tasks: 39 (limit: 5047)
   Memory: 461.5M
   CGroup: /system.slice/mysqld.service
           └─6569 /usr/libexec/mysqld --basedir=/usr
Secure Database Server by:
- Setting a secure root user password
- Removing the anonymous users from the database
- Disallow remote login as root user
- Delete test database
Run the command below:
$ sudo mysql_secure_installation
Securing the MySQL server deployment.

Connecting to MySQL using a blank password.

VALIDATE PASSWORD COMPONENT can be used to test passwords
and improve security. It checks the strength of password
and allows the users to set only those passwords which are
secure enough. Would you like to setup VALIDATE PASSWORD component?

Press y|Y for Yes, any other key for No: y

There are three levels of password validation policy:

LOW    Length >= 8
MEDIUM Length >= 8, numeric, mixed case, and special characters
STRONG Length >= 8, numeric, mixed case, special characters and dictionary                  file

Please enter 0 = LOW, 1 = MEDIUM and 2 = STRONG: 2
Please set the password for root here.
New password:

Re-enter new password:

Estimated strength of the password: 100
Do you wish to continue with the password provided?(Press y|Y for Yes, any other key for No) : y
By default, a MySQL installation has an anonymous user,
allowing anyone to log into MySQL without having to have
a user account created for them. This is intended only for
testing, and to make the installation go a bit smoother.
You should remove them before moving into a production
environment.

Remove anonymous users? (Press y|Y for Yes, any other key for No) : y
Success.


Normally, root should only be allowed to connect from
'localhost'. This ensures that someone cannot guess at
the root password from the network.

Disallow root login remotely? (Press y|Y for Yes, any other key for No) : y
Success.

By default, MySQL comes with a database named 'test' that
anyone can access. This is also intended only for testing,
and should be removed before moving into a production
environment.


Remove test database and access to it? (Press y|Y for Yes, any other key for No) : y
 - Dropping test database...
Success.

 - Removing privileges on test database...
Success.

Reloading the privilege tables will ensure that all changes
made so far will take effect immediately.

Reload privilege tables now? (Press y|Y for Yes, any other key for No) : y
Success.

All done!
Test that you can login successfully as root user:
$ mysql -u root -p
Enter password: <Enter-root-user-password>
Welcome to the MySQL monitor.  Commands end with ; or \g.
Your MySQL connection id is 10
Server version: 8.0.17 Source distribution

Copyright (c) 2000, 2019, Oracle and/or its affiliates. All rights reserved.

Oracle is a registered trademark of Oracle Corporation and/or its
affiliates. Other names may be trademarks of their respective
owners.

Type 'help;' or '\h' for help. Type '\c' to clear the current input statement.
mysql> QUIT
Bye
You now have a running MySQL 8 database running on Oracle Linux 8 system.
https://techviewleo.com/how-to-install-mysql-on-oracle-linux-server/
MySQL 삭제 방법
How to Remove MySQL Completely from Linux System
Some time we face issues with mysql installation. If we simply remove MySQL Packages and re-install doesn't fixes, in that case we require a full uninstall.
tecadmin.net
mysql에서
유저 생성 및 권한 설정
마지막 코드로 반영해준다
CREATE DATABASE mydb;

CREATE USER 'myuser'@'%' IDENTIFIED WITH mysql_native_password BY 'myuserpwd';

GRANT ALL PRIVILEGES ON mydb.* TO 'myuser'@'%' WITH GRANT OPTION;

FLUSH PRIVILEGES;

SHOW DATABASES;
SHOW TABLES;
workbench 원격 접속
- + 아이콘을 눌러 새로운 접속 설정창 표시
- Connection Name : oracle cloud mydb
- Hostname : xxx.xxx.xxx.xxx
- Username : xxx
- Default Schema : 생성된 db 이름
- [Test Connection] 누르고 접속성공 확인
- Password : 설치할 때 입력한 암호
- [OK]
- Workbench 첫 화면에 새로 생성된 접속 사각형 영역 클릭

Spring boot 프로젝트를 *.war 파일로 저장하여 오라클 가상머신의 Tomcat에 배포하기
타겟 시스템과 일치하는 Java 버전 확인
- 개발 시스템에 설치된 Java 버전은 타겟 시스템과 일치하나?
- Spring boot 프로젝트의 build path / Library 에 설정된 Java 버전은 타겟 시스템과 일치하나?
- Spring boot 프로젝트의 pom.xml 파일에 선언된 Java 버전은 타겟 시스템과 일치하나?
간단한 스프링 앱을 준비
pom.xml 확인 <dependcy> 확인
  - <packaging>war</packaging>
  - <java.version>11</java.version>
main java 수정
package com.example.demo;

import org.springframework.boot.SpringApplication;
import org.springframework.boot.autoconfigure.SpringBootApplication;
import org.springframework.boot.builder.SpringApplicationBuilder;
import org.springframework.boot.web.servlet.support.SpringBootServletInitializer;

@SpringBootApplication
public class VmTestApplication extends SpringBootServletInitializer {

	public static void main(String[] args) {
		SpringApplication.run(VmTestApplication.class, args);
	}

  @Override
  protected SpringApplicationBuilder configure(SpringApplicationBuilder builder) {
     return builder.sources(VmTestApplication.class);
  }

}
WAR 파일 생성
프로젝트가 정상적으로 작동한다면...
maven clean
> maven install
> *.war 파일 생성 확인 생성된 war 파일을 ROOT.war 으로 변경하고
톰캣의 webapps/ 안에 복사 (filezilla or putty 파일전송)
후 톰캣을 실행하면 된다 웹브라우저에서 톰캣 호스트에 접속하여 실행여부 확인
+PuTTY를 사용한 파일전송
PuTTY를 사용한 파일전송
C:\test>pscp -i key.ppk c:\\test\\sample.html opc@152.xx.xx.xx:/home/opc
File > 사이트 관리자 > New site > 프로토콜:SFTP > 호스트:152.xxx.xxx.xxx >
사용자:opc > 키 파일:개인 ppk파일 선택 > 연결
filezilla
1. 파일질라 클라이언트 파일 다운로드
- 다운로드 경로 : https://filezilla-project.org/
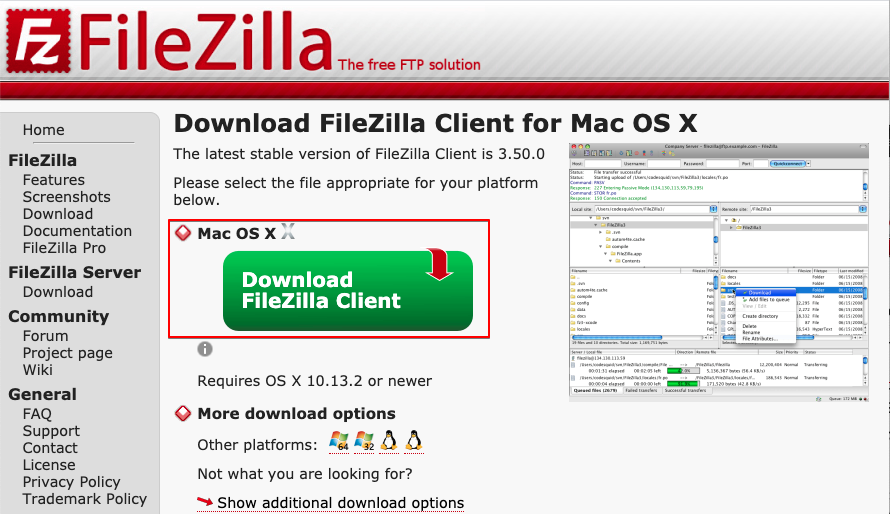
- 다운로드 방법 : 웹사이트 접속 후 아래 그림과 같이 "Download Filezilla Client" 다운로드 버튼 클릭 후 이동 합니다.
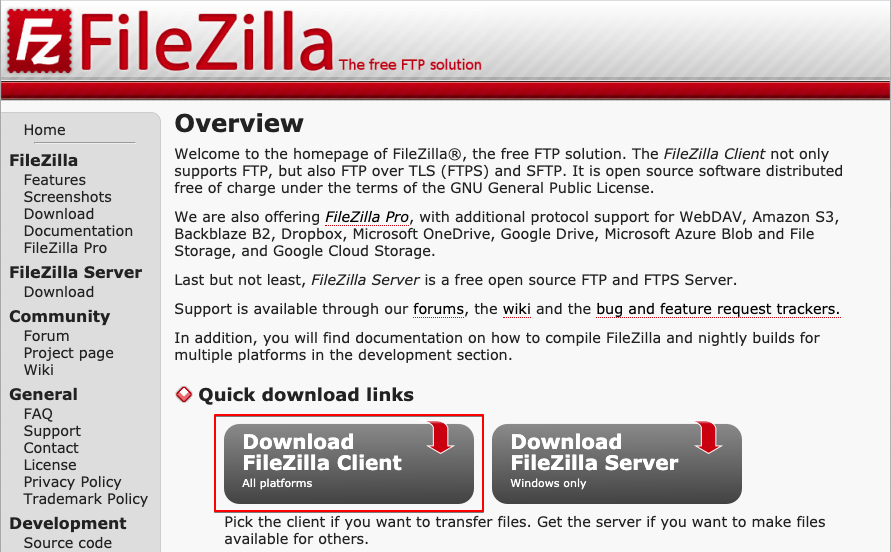
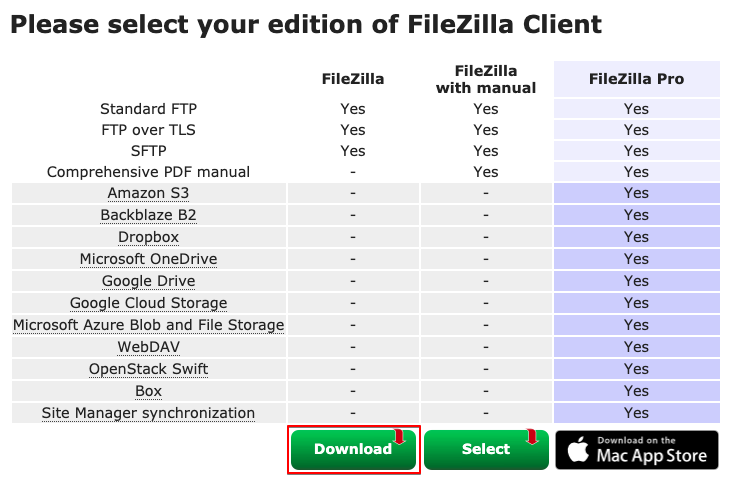
- OS에 맞는 설치 파일을 다운로드 버튼 클릭 후 이동 합니다.
- 다양한 파일질라 설치 파일이 있고, 이중 무료 버전인 "FileZilla" 다운로드를 클릭 합니다.
2. 파일질라 설치와 실행
- MacOS에서는 별도의 설치없이 다운로드받은 파일에 대해 압축 해제 후 클릭만으로 실행이 가능합니다.
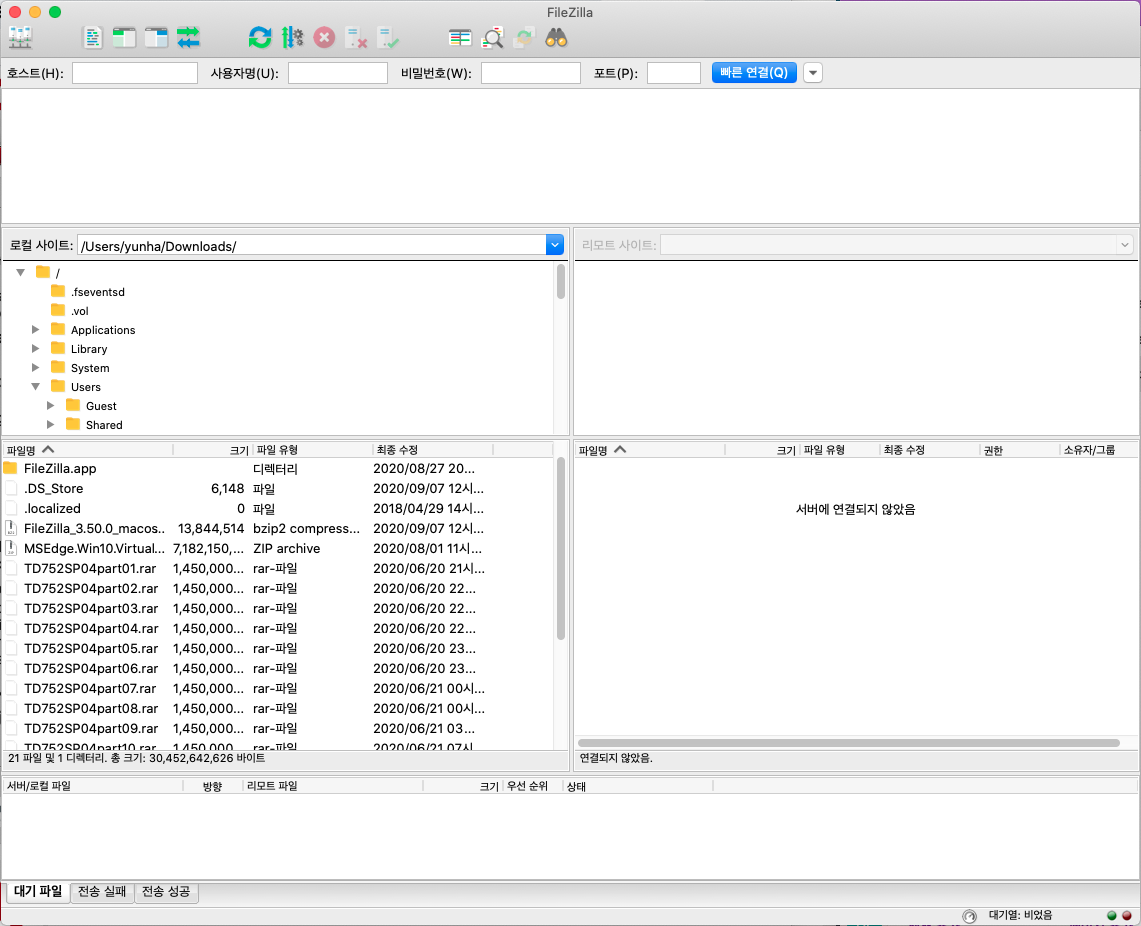
- 단, MacOS "어플리케이션"에 등록하여 사용할 경우, 다운로드받은 파일의 압축 해제 후 해당 파일을 "어플리케이션" 폴더로 이동하면 됩니다.

+사용법


[FileZilla] 파일질라 FTP, SFTP, AWS EC2 접속 방법
이전 포스팅에서 윈도우즈, MacOS에서 파일질라를 설치하는 방법에 대해 알아보았고, 이번 포스팅에서는 파일질라를 이용하여 시스템 접속과 데이터 업로드&다운로드 방법에 대해 소개하도록 하
mpjamong.tistory.com
->어재는 고양이가 안와서 문제였고 오늘은 고양이가 안가서 문제였다. 그레서 개발자가 고양이를 모시나보다
'+++팁+++' 카테고리의 다른 글
| maven clean / maven install error 오류 (0) | 2022.02.13 |
|---|---|
| tomcat 9 favicon 바꾸기 (0) | 2022.02.12 |
| m1 mysql 재설치 feat. homebrew (0) | 2022.02.11 |
| oh my zsh feat.powerlevel10k (0) | 2022.02.11 |
| 자바) 인터파크 도서 openapi json응답 피싱하기 (0) | 2022.01.30 |